[TIL] Kotlin Splash Screen에 Lottie 애니메이션 적용하기 ( Splash Screen Library )
-1- Splash Screen에 Lottie Animation 적용하기 ( Splash Screen Library )
- Android 12 ( API Level 31 ) 이상부터는 앱 아이콘에 따라 자동적으로 Splash화면이 생성되는데 해당 Splash 화면을 사용하지 않을 수는 없는데, Lottie Json 파일을 사용할 수 없게 되어있다. 임시방편으로 기본 Icon Splash 화면을 보이지 않게 하고 Acitivty를 따로 만들어서 Splash 화면을 띄우는 방법을 선택했다.
Splash Screen에 Lottie 적용 예시 ( API Level 33 으로 구동 )

[ 1 - 1 ] Lottie 파일 다운받기
Lottie Files → Lottie Animation JSON 파일을 다운로드 할 수 있는 웹 사이트
LottieFiles: Download Free lightweight animations for website & apps.
Effortlessly bring the smallest, free, ready-to-use motion graphics for the web, app, social, and designs. Create, edit, test, collaborate, and ship Lottie animations in no time!
lottiefiles.com

- 상단 Products 탭의 Free Animations 으로 들어가서 원하는 무료 애니메이션 파일을 선택하자.
Json 의 형태로 Lottie JSON 다운로드

- 우측에 Download 버튼 클릭 후 Lottie JSON으로 Json 형태의 파일로 다운로드 받아준다.
[ 1 - 2 ] Lottie 파일 Android Studio 에 넣기
- Android Studio에서 프로젝트를 생성할 경우 일반적으로 res 폴더 내에 raw Directory가 생성되어 있지 않아서 raw Directory를 먼저 생성해주도록 하자.


- 생성한 raw Directory 안에 다운받은 Lottie Json 파일을 넣어준다.
[ 1 - 3 ] buildgradle 설정
build.gradle( module )
GitHub - airbnb/lottie-android: Render After Effects animations natively on Android and iOS, Web, and React Native
Render After Effects animations natively on Android and iOS, Web, and React Native - GitHub - airbnb/lottie-android: Render After Effects animations natively on Android and iOS, Web, and React Native
github.com
dependencies {
  implementation 'com.airbnb.android:lottie:6.1.0'
}- dependencies에 위에 Github README 하단에 안내된 최신 버전의 Lottie를 추가해준다
- SplashScreen Library는 minSdk가 최소 21 이상이어야 한다.
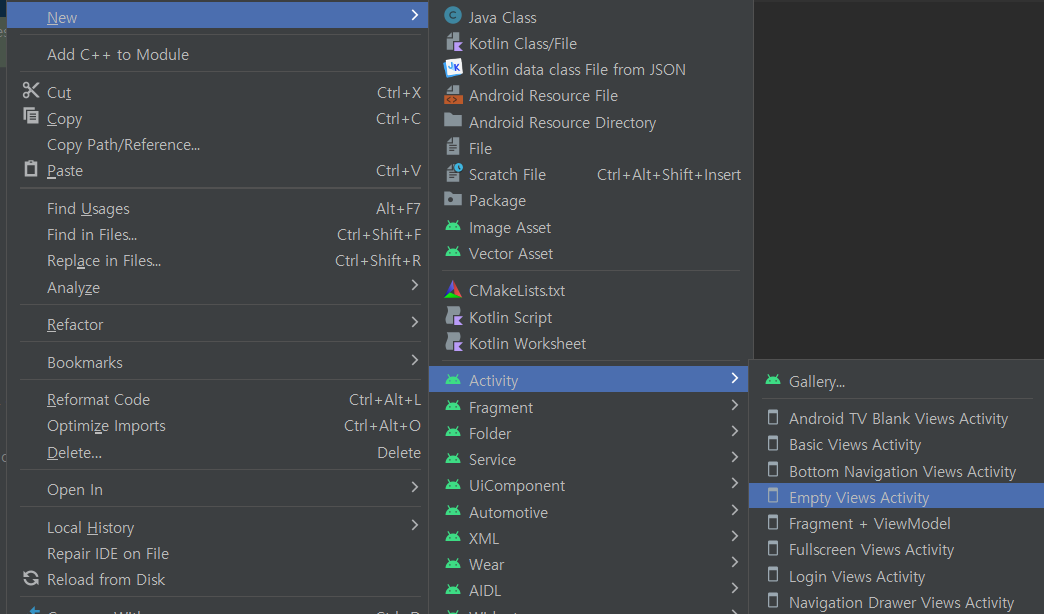
SplashScreen Activity 생성 및 XML 구성
- Activity 생성 시 class로 생성 후 AppCompatActivity 로 지정해줘도 되지만, Empty Views Activity로 생성하는 것이 번거롭지도 않고 실수하지 않을 수 있어서 좋다. 글쓴이는 해당 기능을 배우면서 class를 직접 생성해서 코드를 작성하다가 onCreate 메서드( persistableBundle이 포함된 메서드 )를 잘못 오버라이딩 했다.
activity_splash.xml
<androidx.constraintlayout.widget.ConstraintLayout xmlns:android="http://schemas.android.com/apk/res/android"
    xmlns:app="http://schemas.android.com/apk/res-auto"
    android:layout_width="match_parent"
    android:layout_height="match_parent">

    <com.airbnb.lottie.LottieAnimationView
        android:id="@+id/lottie_img"
        android:layout_width="0dp"
        android:layout_height="0dp"
        app:lottie_rawRes="@raw/animation_lnh26gsm"
        app:lottie_autoPlay="true"
        app:lottie_loop="true"
        android:layout_marginTop="100dp"
        android:layout_marginBottom="150dp"
        app:layout_constraintBottom_toBottomOf="parent"
        app:layout_constraintEnd_toEndOf="parent"
        app:layout_constraintStart_toStartOf="parent"
        app:layout_constraintTop_toTopOf="parent" />

    <TextView
        android:id="@+id/textView"
        android:layout_width="0dp"
        android:layout_height="wrap_content"
        android:layout_marginStart="50dp"
        android:layout_marginTop="50dp"
        android:layout_marginEnd="50dp"
        android:text="Splash Screen"
        android:textStyle="bold"
        android:textSize="24sp"
        android:gravity="center"
        app:layout_constraintEnd_toEndOf="parent"
        app:layout_constraintStart_toStartOf="parent"
        app:layout_constraintTop_toBottomOf="@+id/lottie_img" />

</androidx.constraintlayout.widget.ConstraintLayout>- LottieAnimationView를 생성해주고 raw Difectory에 넣어둔 lottie 애니메이션 Json 파일을 rawRes를 통해 지정해준다.
- autoPlay = true로 애니메이션이 자동으로 시작되도록 설정해주고 , loop = true 를 통해 애니메이션이 반복되도록 설정해준다.
SplashActivity.kt
class SplashActivity : AppCompatActivity() {
    override fun onCreate(savedInstanceState: Bundle?) {
        super.onCreate(savedInstanceState)
        // Splash 화면을 설정하고, 애니메이션, Dalay 등의 속성을 구성하는 함수 호출
        installSplashScreen()
        setContentView(R.layout.activity_splash)

        var anim = findViewById<LottieAnimationView>(R.id.lottie_img)
        anim.playAnimation()

        val handler = Handler(Looper.getMainLooper())
        handler.postDelayed({
            run {
                startActivity(Intent(this, MainActivity::class.java))
                finish()
            }
        }, 3000L) // SplashScreen 이 지속되는 시간 지정.
    }
}
res / values / themes
<resources xmlns:tools="http://schemas.android.com/tools">
    <style name="Base.Theme.Mise" parent="Theme.Material3.DayNight.NoActionBar">
    </style>
    <style name="Theme.Mise" parent="Base.Theme.Mise" />

    <style name="Theme.AppCompat.Splash" parent="Theme.SplashScreen">
        // 기본 Icon Splash Screen 투명하게 변경.
        <item name="android:windowIsTranslucent">true</item>

        // Splash Screen이 끝나면 이어지는 Theme 지정
        <item name="postSplashScreenTheme">@style/Base.Theme.Mise</item>
    </style>
</resources>
✔️ Android 12 ( API Level 31 ) 이상부터는 기본적으로 앱 Icon에 따른 Splash 화면이 자동으로 실행된다.

해결 방법
- Android 12 이상에서는 앱에 기본적인 Splash 화면이 Icon에 따라 자동으로 적용이 되어지는데, Splash Activity에서 별도로 Splash 화면을 구성하게 된다면, 기본 앱 아이콘 Splash 화면이 먼저 나오고 난 뒤에 별도로 생성한 Splash Activity 화면이 보여지고 그 이후에 MainActivity가 실행되어진다.
- 이러한 이유 때문에 기본적으로 적용되는 Splash Screen을 <item name="android:windowIsTranslucent">true</item> 을 적용해서 투명하게 만들어 기본 앱 아이콘 Splash 화면이 마치 사용되지 않는 것 처럼 보이게 하는 것이다.
➕ Lottie 애니메이션을 사용하지 않고 별도로 Splash 화면을 구성하는 방법
<resources xmlns:tools="http://schemas.android.com/tools">
    <style name="Base.Theme.Mise" parent="Theme.Material3.DayNight.NoActionBar">
    </style>
    <style name="Theme.Mise" parent="Base.Theme.Mise" />

    <style name="Theme.AppCompat.Splash" parent="Theme.SplashScreen">

        // Splash 화면 배경색상 지정
        <item name="windowSplashScreenBackground">@color/grade_poor</item>

        // Animation or Img 지정
        <item name="windowSplashScreenAnimatedIcon">@drawable/ic_launcher_foreground</item>
        <item name="windowSplashScreenAnimationDuration">200</item>

        // Splash Screen이 끝나면 이어지는 Theme 지정
        <item name="postSplashScreenTheme">@style/Base.Theme.Mise</item>
    </style>
</resources>- 해당 방법으로 Splash 화면을 띄울 경우 별도로 Splash Activity를 생성하지 않고 theme 적옹으로 splash 이미지 ,애니메이션을 변경할 수 있지만 애니메이션의 경우 animation - list Drawable 을 직접 만들어서 사용해야 하기 때문에 번거롭다. Image만 사용하게 될 경우에는 해당 방법으로 Splash Screen을 변경하는 것이 바람직하다.
Manifest.xml
        <activity
            android:name=".ui.view.MainActivity"
            android:exported="true">
        </activity>
        <activity
            android:theme="@style/Theme.AppCompat.Splash"
            android:name=".ui.view.SplashActivity"
            android:exported="true">
            <intent-filter>
                <action android:name="android.intent.action.MAIN" />

                <category android:name="android.intent.category.LAUNCHER" />
            </intent-filter>
</activity>- themes 에서 만든 Splash theme를 theme로 지정해주고 intent-filter를 통해 시작 Activity를 Splash Activity로 바꾸어 준다.
MainActivity.kt
class MainActivity : AppCompatActivity() {
    private lateinit var binding : ActivityMainBinding

    override fun onCreate(savedInstanceState: Bundle?) {
        installSplashScreen()
        super.onCreate(savedInstanceState)
        binding = ActivityMainBinding.inflate(layoutInflater)
        setContentView(binding.root)

        ...

    }
}- MainActivity의 onCreate 호출 전에 installSplashScreen() 함수 호출을 해주면 끝.
[오늘 복습한 내용]
1. Handler를 사용할 때 Looper를 넣지 않고 Handler 단독으로 사용할 경우 Deprecated 되었다는 문구가 보인다. Looper에 대해서 추가로 정리해볼 예정
[오류,에러 등등]
1. Splash Activity가 정상적으로 작동하지 않는 현상.
문제 코드

- PersistableBundle? 이라는 코드가 있다 Activity 생성 시 class 파일로 생성 후 onCreate를 override 할 때 persistableBundle이 함께 있는 메소드를 불러와서 생기게 된 것이다.

해결방법 - persistantState : PersistableBundle? 파라미터를 지워줬다. 추후에 해당 메소드에 대해서도 학습해볼 예정.
class SplashActivity : AppCompatActivity() {
    override fun onCreate(savedInstanceState: Bundle?) {
        super.onCreate(savedInstanceState)
        setContentView(R.layout.activity_splash)

        var anim = findViewById<LottieAnimationView>(R.id.lottie_img)
        anim.playAnimation()

        val handler = Handler(Looper.getMainLooper())
        handler.postDelayed({
            run {
                startActivity(Intent(this, MainActivity::class.java))
                finish()
            }
        }, 3000L)
    }
}
2. theme에서 postSplasgScreenTheme로 초기 base Theme를 설정해주었는데 Splash 화면이 끝나면 해당 오류가 발생하며 앱이 종료되는 현상

해결 방법 - Rebuild
3. theme에서 postSplasgScreenTheme로 초기 base Theme를 설정해주었는데 Splash 화면이 끝나면 해당 오류가 발생하며 앱이 종료되는 현상2
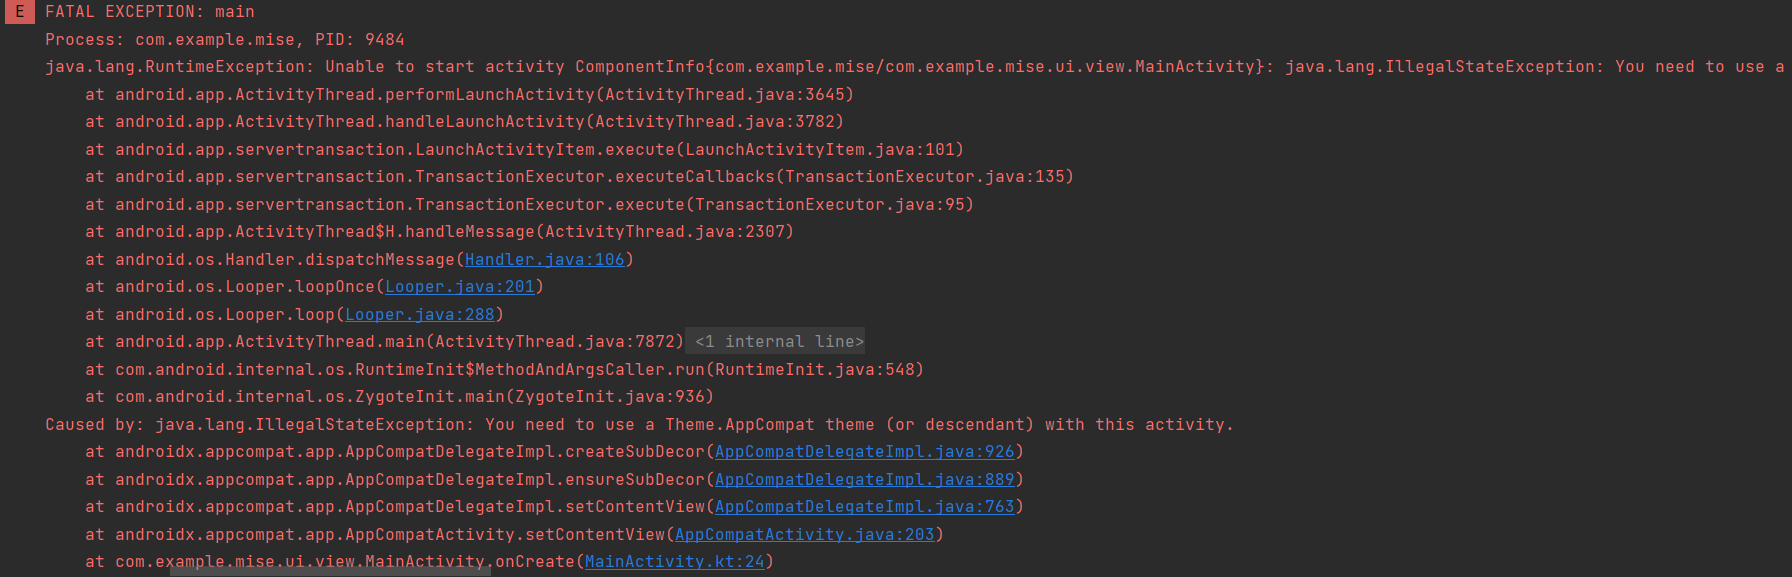
- 테마 설정의 오류라고 하는데 postSplashScreenTheme 도 정상적으로 지정을 해주었는데 해당 오류가 나왔다.
해결방법 - MainActivity의 onCreate 전 InstallSplashScreen 호출하니 해결 됨.
[느낀 점]
1. 버전마다 지원하는 기능이 달라서 버전 관리에 대해서도 신경을 써봐야겠다.
2. UI 관련 기능도 다양한 키워드가 있어서 공식문서를 틈틈이 확인해야겠다.
3. 에어 비앤비 공유 숙박 업소도 하고, 라이브러리도 만들고... 신기한 곳이다
[Reference]
// Splahsh
https://stackoverflow.com/questions/67921860/disable-android-12-default-splash-screen
https://developer.android.com/guide/topics/ui/splash-screen?hl=ko