[오늘 배운 내용]
-1- Fragment
- Fragment란?
- Activitiy 안에서 화면의 일부를 구성하는 것이다.
- Fragment는 또 다른 Fragment 내에서도 생성될 수 있다.
- Fragment 사용하는 이유
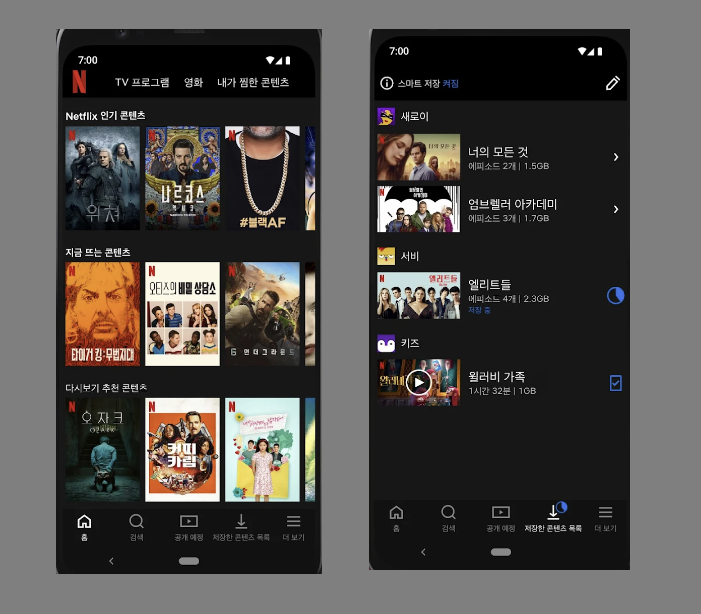
- 간단한 예시로 확인해보자
-
- 넷플릭스의 홈 화면에서 Bottom Navigation으로 내가 저장한 콘텐츠 목록로 이동을 할 때 별도의 Activity를 생성해서 이동할 수도 있지만 Fragment를 사용해서 화면의 일부 VIew만 바꾸는 것이 자원 이용량이 적어 속도가 빠르며 각 액티비티 별 Bottom Navigation을 별도로 생성해주지 않아도 되고, Aciticity의 복잡성을 낮출 수 있는 등 유지보수가 편리하다.
- Fragment의 특징
- Fragment 자체로 View에 나타날 수 없다
- Fragment는 Acitivity나 다른 Fragment에 의해 호스팅 되어야 하며, 독립적으로 화면 구성이 가능하고 자체적인 입력 이벤트를 처리할 수 있다. Activity에 속해 있는 Button 등의 입력 이벤트를 통해 Fragment를 보이게 하거나, 안보이게 하거나, 다른 Fragment로 전환하는 등 Activity의 화면 구성을 유연하게 만든다.
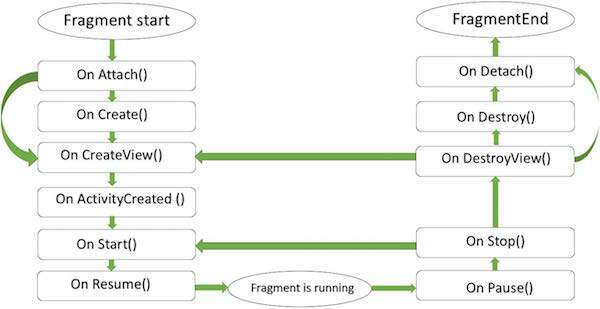
- Fragment는 자체적인 수명주기를 갖는다
- Fragment 자체로 View에 나타날 수 없다
-
- Fragment는 재사용이 가능하다.
- 한 Fragment의 객체는 다수의 Activity에서 생성할 수 있다
- Fragment는 재사용이 가능하다.
- Fragment 적용하기
- build.gradle 의 dependencies 추가.
dependencies{
	...
	implementation("androidx.fragment:fragment-ktx:1.6.1")
}
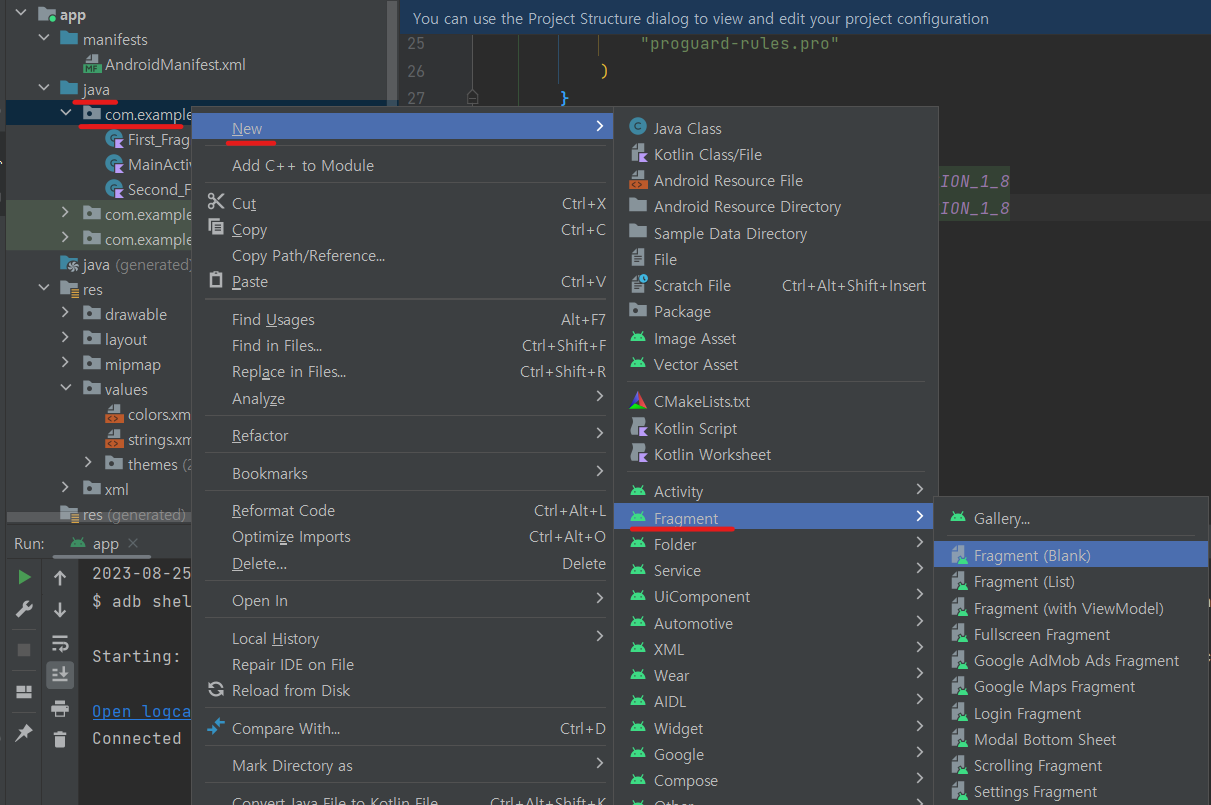
- Fragment 생성하기
- Fragment 생성
-
- Fragment를 생성하면 fragment.xml 과 해당 Fragment를 제어하고 관리하는 kt파일이 생성된다. 코드상에서 Fragment는 Fragment 타입의 클래스로 볼 수 있다고 한다
-
- Fragment를 호스팅할 액티비티 xml 화면 구성
<androidx.constraintlayout.widget.ConstraintLayout xmlns:android="http://schemas.android.com/apk/res/android"
    xmlns:app="http://schemas.android.com/apk/res-auto"
    xmlns:tools="http://schemas.android.com/tools"
    android:layout_width="match_parent"
    android:layout_height="match_parent"
    tools:context=".MainActivity"
    android:background="@color/light_grey"
    >


    <FrameLayout
        android:id="@+id/main_frameLayout"
        android:layout_width="0dp"
        android:layout_height="0dp"
        android:layout_marginStart="10dp"
        android:layout_marginTop="60dp"
        android:layout_marginEnd="10dp"
        android:layout_marginBottom="80dp"
        app:layout_constraintBottom_toBottomOf="parent"
        app:layout_constraintEnd_toEndOf="parent"
        app:layout_constraintStart_toStartOf="parent"
        app:layout_constraintTop_toTopOf="parent">

    </FrameLayout>

    <Button
        android:id="@+id/btn_fragment1"
        android:layout_width="180dp"
        android:layout_height="40dp"
        android:layout_marginStart="16dp"
        android:layout_marginBottom="20dp"
        android:text="Fragment1"
        app:layout_constraintBottom_toBottomOf="parent"
        app:layout_constraintStart_toStartOf="parent"
        tools:ignore="TouchTargetSizeCheck" />

    <Button
        android:id="@+id/btn_fragment2"
        android:layout_width="180dp"
        android:layout_height="40dp"
        android:layout_marginEnd="16dp"
        android:layout_marginBottom="20dp"
        android:text="Fragment2"
        app:layout_constraintBottom_toBottomOf="parent"
        app:layout_constraintEnd_toEndOf="parent"
        tools:ignore="TouchTargetSizeCheck" />


</androidx.constraintlayout.widget.ConstraintLayout>-
- 여러 화면위에 또다른 화면을 가져올 수 있는 Layout이 필요함으로 FrameLayout 사용
- btn_fragment1 클릭 시 FirstFragment가, btn_fragment2 클릭 시 SecondFragment가 보여지도록 버튼 생성
-
- fragment xml 화면구성
<FrameLayout xmlns:android="http://schemas.android.com/apk/res/android"
    xmlns:tools="http://schemas.android.com/tools"
    android:layout_width="match_parent"
    android:layout_height="match_parent"
    tools:context=".First_Fragment"
    android:background="@color/mint">


    <!-- TODO: Update blank fragment layout -->
    <TextView
        android:layout_width="match_parent"
        android:layout_height="match_parent"
        android:text="1st Fragment"
        android:gravity="center"
        android:textSize="20sp"
        android:textStyle="bold"
        />

</FrameLayout>
- Fragment 사용하기
- kotlin 코드에 동적으로 Fragment 추가하기
private fun setFragment(fragment: Fragment) {
        supportFragmentManager.commit {
            replace(R.id.main_frameLayout, fragment)
            setReorderingAllowed(true)
            addToBackStack(null)
        }
}-
- supportFragmentManager
사용자 상호작용에 응답해 Fragment를 추가하거나 삭제하는 등 작업을 할 수 있게 해주는 매니저 - replace
어느 프레임 레이아웃에 어떤 Fragment를 띄울 것인지 설정 - setReorderingAllowerd
애니메이션과 전환이 올바르게 작동하도록 트랜잭션과 관련된 Fragment의 상태 변경을 최적화 - addToBackStack
뒤로가기 버튼 클릭 시 다음 액션 ( 이전 Fragment로 가거나 앱이 종료 되거나)
- supportFragmentManager
-
- 버튼 클릭 시 Fragment 화면 전환하도록 코드작성
	viewBinding.btnFragment1.setOnClickListener {
            setFragment(First_Fragment())
        }
        viewBinding.btnFragment2.setOnClickListener {
            setFragment(Second_Fragment())
        }
    }
- 완성화면
-2- BottomNavigation 에 Fragment 적용하기
- BottomNavigation 생성하기
- 1. Menu 생성
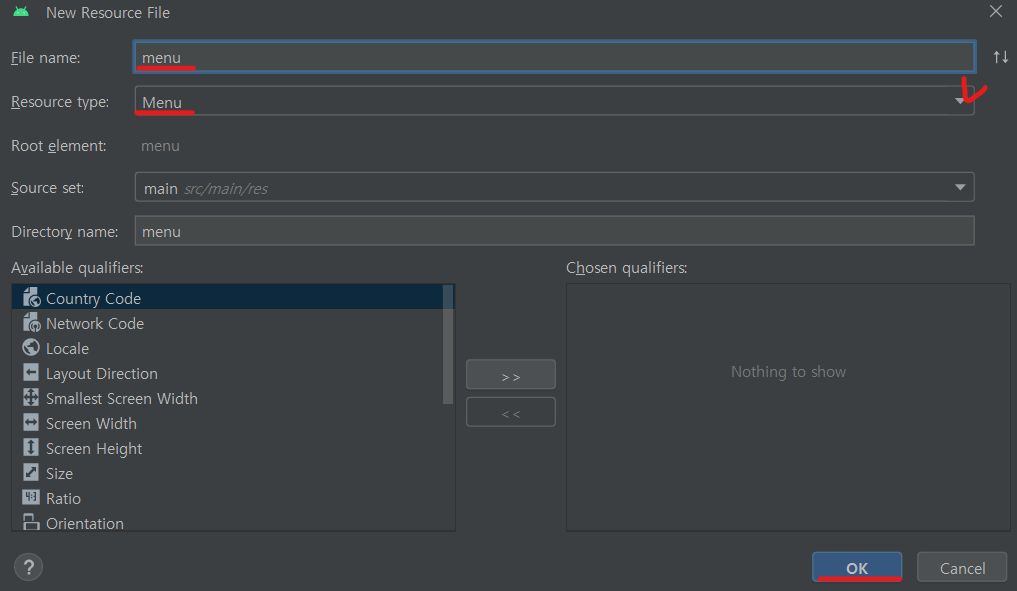
- app/New/Android Resource File
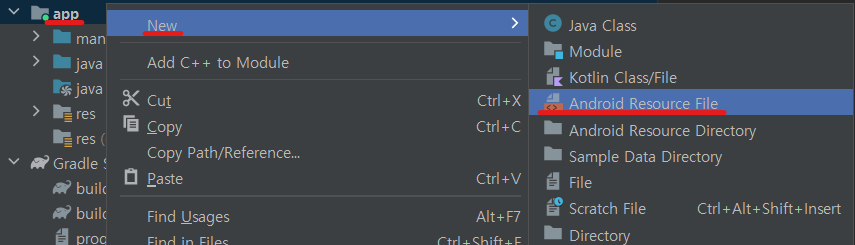
-
- Resource Type을 Menu로 지정 후 OK 폴더와 menu.xml 파일까지 생성해준다.
-
- menu에 item 넣어주기
<menu xmlns:android="http://schemas.android.com/apk/res/android" >
    <item
        android:id="@+id/libraryIcon"
        android:icon="@drawable/baseline_library_books_36"
        android:title="Library"
        android:enabled="true"
        />
    <item
        android:id="@+id/homeIcon"
        android:icon="@drawable/baseline_home_36"
        android:title="Home"
        android:enabled="true"
        />

    <item
        android:id="@+id/searchIcon"
        android:icon="@drawable/baseline_search_36"
        android:title="Search"
        android:enabled="true"
        />
    <item
        android:id="@+id/settingIcon"
        android:icon="@drawable/baseline_settings_36"
        android:title="Settings"
        android:enabled="true"
        />

</menu>-
- Menu 아이템 속성들
- enabled = 메뉴 항목이 활성화 시키려면 true, 비활성화 되기를 원한다면 false, enabled가 없다면 기본적으로 true다.
- checkable = 토글형식으로 메뉴항목을 체크할 수 있게 해준다. BottomNavigation보단 Toolbar에서 사용될 것 같음.
- visible = 메뉴 항목이 처음부터 표시 된다면 true, 숨겨져 있다면 false
- showAsAction = 메뉴 항목이 옵션bar (예 : bottomNavigation Bar, Tool Bar) 에 표시되는 방법을 정한다.
- never = 항상 아이템 표시하지 않음
- ifRoom = 아이템을 표시할 수 있는 공간이 있다면 아이템을 표시함
- always = 항상 아이템 표시
- withText = 메뉴 항목의 텍스트를 함께 아이템으로 표시. App Bar, Tool Bar에서 주로 사용
- tooltipText = 사용자가 메뉴 항목 위에 커서를 가져갈 때 표시되는 도구 설명 텍스트를 설정. 기본은 title
BottomNavigation 생성
- bottomNavigationVIew를 이용해서 만들어놓은 menu 와 연결하기.
<?xml version="1.0" encoding="utf-8"?>
<androidx.constraintlayout.widget.ConstraintLayout xmlns:android="http://schemas.android.com/apk/res/android"
    ...
    >


    <FrameLayout
        ...

    </FrameLayout>

    <com.google.android.material.bottomnavigation.BottomNavigationView
        android:id="@+id/bottom_navigation_view"
        android:layout_width="match_parent"
        android:layout_height="80dp"
        app:menu="@menu/menu_bottom_nav"

        app:layout_constraintBottom_toBottomOf="parent"
        app:layout_constraintEnd_toEndOf="parent"
        app:layout_constraintStart_toStartOf="parent"
        app:layout_constraintTop_toBottomOf="@+id/main_frameLayout" />


</androidx.constraintlayout.widget.ConstraintLayout>- material이 없어 오류가 날 경우 build.gradle(Module :app) → dependencies에 material 추가해주기.
dependencies {
	...

	implementation("com.google.android.material:material:1.9.0")

}
Fragment와 연결
class MainActivity : AppCompatActivity() {
    private lateinit var viewBinding: ActivityMainBinding

    override fun onCreate(savedInstanceState: Bundle?) {
        super.onCreate(savedInstanceState)

        viewBinding= ActivityMainBinding.inflate(layoutInflater)
        setContentView(viewBinding.root)


        setFragment(First_Fragment())
        viewBinding.bottomNavigationView.setOnItemSelectedListener {
            when (it.itemId){
                R.id.homeIcon -> setFragment(First_Fragment())
                R.id.libraryIcon -> setFragment(Second_Fragment())
                else -> First_Fragment()
            }
            true
        }
    }

    private fun setFragment(fragment: Fragment) {
        supportFragmentManager
            .beginTransaction()
            .replace(R.id.main_frameLayout, fragment)
            .setReorderingAllowed(true)
            .addToBackStack(null)
            .commit()
    }
}
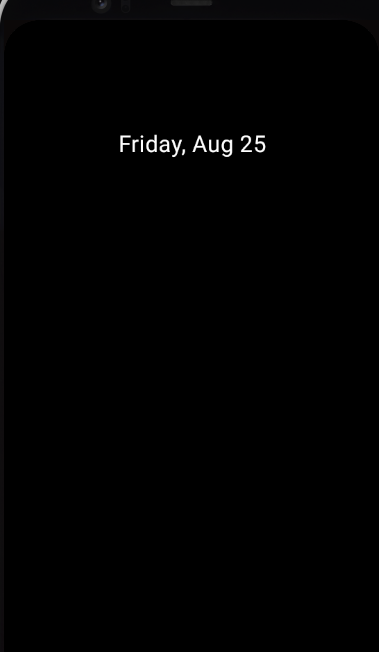
- 결과화면
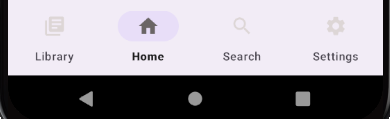
BottomNavigation Title 설정
- 선택된 Menu의 title만 보이는 것이 기본 설정.
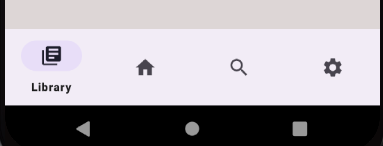
- 모든 Menu의 title이 보이게 적용하기
<com.google.android.material.bottomnavigation.BottomNavigationView
	...
    ...
    app:labelVisibilityMode="labeled"

    />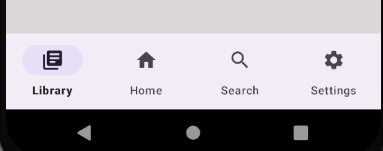
메뉴 선택 시 아이콘 색상 변경 IconTint
- 선택된 메뉴 아이콘의 색상과 선택되지 않은 메뉴 색상이 같아 밋밋하다. 선택된 아이콘 색상을 변경 해보자
- item_color.xml 생성
<selector xmlns:android="http://schemas.android.com/apk/res/android">
    <item android:color="@color/dark_grey" android:state_checked="true"/>
    <item android:color="@color/light_grey" android:state_checked="false"/>

</selector>-
- 선택되어 있는 메뉴 아이콘 색상을 지정하고, state_checked = true 로 상태 지정, 선택중이지 않은 것은 false
<com.google.android.material.bottomnavigation.BottomNavigationView
        ...
        app:itemIconTint="@drawable/item_color"
 />
- 적용 화면
[오늘 복습한 내용]
1. 프로그래머스 코딩테스트 입문 숫자 찾기

- 작성 코드
class Solution {
    fun solution(num:Int, k:Int):Int{
        val numArr = num.toString().split("")
        var answer  = if (numArr.contains(k.toString())){
            return numArr.indexOf("$k")
        } else{
            return -1
        }
        return answer
    }
}
[오류,에러 등등]
1. System UI isn't responding
- 애뮬레이터를 켰는데, 상태 바가 보이지 않고, overVIew도 작동하지 않는다.
- 틈틈이 UI isn't responding 에러 메시지가 나와서 프로그램이 재실행
해결방법
- 애뮬레이터 종료
- C드라이브 → user → myUserName → .android → avd → errorEmulatorFolder → userdata-qemu,img 삭제
- 애뮬레이터 재실행

- 오류는 해결 되었지만, 그동안 해당 애뮬레이터에 저장한 앱과 데이터들도 초기화 되었다.
[느낀 점]
1. https://todaycode.tistory.com/131 오늘 학습내용 웹서치 하다가 찾은 블로그인데, 설명을 종이 그림으로 하시는데 아이디어가 참 좋으신 것 같다. 작은 아이디어 하나 하나의 중요성을 느꼈다
2. 평일 아침엔 알고리즘을 풀고 팀원들과 각자 풀이를 공유하는 시간을 갖는데, 다들 코드를 직관적이게 잘 작성하셔서 다른 사람들이 쉽게 이해할 수 있는 코드가 중요하다는 것을 다시 한번 느꼈다.
3. 매일 들이는 시간에 비해서 학습되는 양이 적은 느낌이다 학습 속도를 높여야겠다.
[Reference]
내배캠 학습자료 - 주소를 가져오면 안될 것 같다.
https://everyshare.tistory.com/6
'TIL' 카테고리의 다른 글
| [TIL] 뒤로가기 버튼 클릭 이벤트 | putExtra, getParcelableExtra로 데이터 옮기기 (0) | 2023.08.30 |
|---|---|
| [TIL] Dialog, 알림 (Notification), Intent FLAG (0) | 2023.08.29 |
| [TIL] RecyclerView (0) | 2023.08.24 |
| [TIL] Adapter 활용한 ListView, GridView (0) | 2023.08.23 |
| [TIL] ViewBinding, you need to use a theme.appcompat theme에러 (2) | 2023.08.22 |


